STRATEGIES TO HELP IDENTIFY SIMILARITIES & DIFFERENCES
1. Venn Diagram:
Basics:
Time Needed: 10 - 20 minutes
Room arrangement: Any
Materials: Venn Diagram Template/paper, pencil, overhead
Room arrangement: Any
Materials: Venn Diagram Template/paper, pencil, overhead
Process Directions:
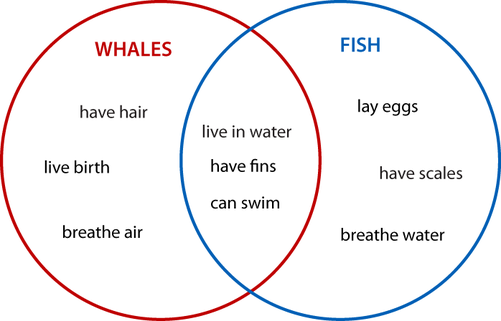
A Venn Diagram is a tool typically using intersecting circles to compare and contrast two or three things or ideas. It is a graphic organizer that helps students visualize the ways different things can coincide with one another.
1. The teacher models the drawing or describes template that students have.
2. Teacher decides or the students and teacher decide together the main things/aspects to compare. Write these as "labels" at the top of each of the circles.
3. Brainstorm the characteristics of the two things by deciding the ways in which they are unique and then similar.
4. Unique items are placed inside one of the circles in a section that doesn't intersect with the other circle. Similar items are placed in the middle where the circles cross.
Here is an example of what a typical Venn Diagram using this method will look like.
Walbert, D. (n.d.). Higher order thinking with venn diagrams. Retrieved from http://www.learnnc.org/lp/pages/2646
Examples in a Language Classroom:
Source:
Creator of the Venn Diagram: John Venn.
Encyclopedia Britannica (2014). John venn. Retrieved from http://www.britannica.com/EBchecked/topic/625445/John-Venn
- Spanish: A way that I envision myself using this tool to help students compare and visualize different ideas is with the aspects of different grammar items. For example, together we could compare aspects of the past tense in English and Spanish. This helps the students use their background knowledge to compare and see the similar constructions. Another example would be to compare language moods in Spanish. This is a vital skill that is often hard for students to grasp and I believe a Venn Diagram would be helpful.
- ESL: Beyond grammar comparisons, I think it would be beneficial to compare and contrast different aspects of culture with ESL students. This lends itself to a more individualized approach in that each student can compare their home culture/religion/holiday with that of the culture they're living in. For example, around Thanksgiving time we can create a Venn Diagram comparing Thanksgiving with important cultural holidays in each student's culture.
Source:
Creator of the Venn Diagram: John Venn.
Encyclopedia Britannica (2014). John venn. Retrieved from http://www.britannica.com/EBchecked/topic/625445/John-Venn

2. T - Chart:
Basics:
Time Needed: 10 - 15 minutes
Room Arrangement: Any
Materials Needed: T-chart template, paper, pencil
Process Directions:
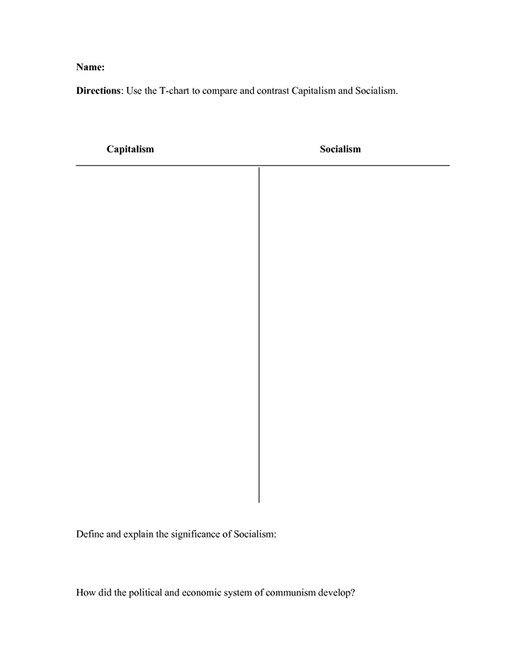
A T-Chart is also a tool to help students compare and contrast different things. It is a two-column chart with a space at the top for titles making the chart look like an uppercase "T." This chart can be used to list different characteristics of the same thing or of different things. For example, the students could list characteristics of two different types of governments or list the pros and cons of one specific type of government.
1. The teacher models the drawing of the T-Chart or refers to their copy of a template
2. The teacher or students decide what things or ideas to compare
3. The teachers and students list characteristics on either side of the chart that pertain to the titles.
4. Items that match up in the sense that they're related should either be connected with lines or written exactly opposite of one another. For example, if the students are comparing the climate of two countries, put each country's name for seasons next to one another on the chart.
Here is an example of a T-Chart used to compare Capitalism and Socialism:
Time Needed: 10 - 15 minutes
Room Arrangement: Any
Materials Needed: T-chart template, paper, pencil
Process Directions:
A T-Chart is also a tool to help students compare and contrast different things. It is a two-column chart with a space at the top for titles making the chart look like an uppercase "T." This chart can be used to list different characteristics of the same thing or of different things. For example, the students could list characteristics of two different types of governments or list the pros and cons of one specific type of government.
1. The teacher models the drawing of the T-Chart or refers to their copy of a template
2. The teacher or students decide what things or ideas to compare
3. The teachers and students list characteristics on either side of the chart that pertain to the titles.
4. Items that match up in the sense that they're related should either be connected with lines or written exactly opposite of one another. For example, if the students are comparing the climate of two countries, put each country's name for seasons next to one another on the chart.
Here is an example of a T-Chart used to compare Capitalism and Socialism:
DocStoc (2013). Retrieved from http://www.docstoc.com/docs/49774842/Name-Directions-Use-the-T-chart-to-compare-and-contrast-Capitalism
Examples in a Language Classroom:
Source:
Chien, C. W. (2012). Use of graphic organizers in a language teachers' professional development Canadian Center of Science and Education 5(10). Retrieved from http://search.proquest.com.ezproxy.arbor.edu/docview/1081341584/abstract/D1CAC532BDE04FE3PQ/1?accountid=13998
- Spanish: A way that I can see myself using this in a Spanish classroom would be to compare different historical features of the target country. For example, we could complete a T-Chart that compares Spain during the dictatorship of Franco with Spain before or after. We could also compare dictators across countries. For example, the leadership of Franco compared with the leadership of Trujillo of the Dominican Republic.
- ESL: Besides using this in a content area with any ELLs, we could also use it to compare grammatical or non-verbal signals. For example, we could write hand signals of Americans on one side and hand signals of other cultures on the other side. We could then compare the very different ways that people can express themselves using their hands.
Source:
Chien, C. W. (2012). Use of graphic organizers in a language teachers' professional development Canadian Center of Science and Education 5(10). Retrieved from http://search.proquest.com.ezproxy.arbor.edu/docview/1081341584/abstract/D1CAC532BDE04FE3PQ/1?accountid=13998

3. Analogies:
Basics:
Time Needed: 10-15 minutes
Room Arrangement: Any
Materials Needed: Analogy template, pencil, paper
Process Directions:
Using analogies to identify similarities and differences is a great way to help make abstract ideas much more concrete, or at least visual, for students. A graphic organizer can be helpful for younger students or ELLs in order to lessen the language load.
1. Refer to template/ ask students to take out a piece of paper.
2. If this is a teacher directed activity, give students part of the analogy. For example, if "A is to B as C is to D" is the analogy, the teacher can give both A and C or just A and B.
3. Students are then independently or in groups responsible for coming up with the rest of the analogy.
4. The class can then reconvene and discuss the different analogies that the students have come up with. Students can be asked to explain why they see it as a fitting analogy.
Here is an example of an analogy graphic organizer that the teacher can use with young learners or ELLs:

VariQuest (2012). Retrieved from http://info.variquest.com/infovariquestcom/blogvariquestcom/bid/228311/Poster-Maker-for-Schools-Visual-Learning-Tools
Examples in a Language Classroom:
Source:
Plaister, T. (1981). Teaching vocabulary, listening comprehension and reading by means of analogies. Foreign Language Annals, 14(1), 25-29. Retrieved from http://ezproxy.arbor.edu:80/login?url=http://search.proquest.com/docview/63659169?accountid=13998
- Spanish: I would use analogies to help students clarify their ideas on many topics. For example, I could help students compare folk heroes from the target culture with folk heroes from their states or USA. I could say "Che Guevara is to Latin America as ___________ is to the US." This would require the students to synthesize their understanding of Che Guevara, history, and Latinos' perceptions along with what they already know about their own country. I think this is a particularly good application of this strategy because it requires students to empathize and understand that other people from other culture's revere people in similar ways for similar reasons.
- ESL: Working with ELLs requires a little more preparation because of the linguistic setup of an analogy. Once the students have been introduced to the language of an analogy, I would like to use this graphic organizer in order to build their understanding of an abstract concept. I would also want to support lower-level learners by only having them brainstorm and create one part of the analogy. A situation I would use this strategy in might be to help students compare elements of culture. For example, "Baseball is to America, as ________ is to your country." The answer doesn't have to be a sport, but it would have to be something authentically from their culture and important to their country.
Source:
Plaister, T. (1981). Teaching vocabulary, listening comprehension and reading by means of analogies. Foreign Language Annals, 14(1), 25-29. Retrieved from http://ezproxy.arbor.edu:80/login?url=http://search.proquest.com/docview/63659169?accountid=13998

4. Metaphor Wall:
Basics:
Time Needed: All times (5-10 minutes during each occurrence).
Room Arrangement: Any
Materials Needed: Poster board/poster paper, markers
Process Directions:
This is a similar idea to having a "word wall." The idea is for teachers and students to point out metaphors when they are encountered in class materials. This helps students connect old vocab with new words and ideas. When a teacher or students find a metaphor, someone in the class will record the metaphor and hang the writing on the wall for all to see (Northwest Regional Educational Laboratory, 2005).
1. Teacher/student draws attention to a metaphor.
2. Teacher/student will write the metaphor on a piece of paper to be hung on the wall. I would also have students keep a journal of metaphors so students could record them for times outside of class.
3. Together we will discuss the meanings of the individual words.
4. We will discuss the appropriateness of the metaphor in the sense of whether the two words/ideas can be compared to one another.
5. We will relate it to any material that we've been discussing in class.
Here is an example of a classroom "Word Wall." This is a great example of what my Word Wall might look like, although it would be focused on metaphors:

Example in a Language Classroom:
Source:
Northwest Regional Educational Laboratory (2005). Identifying similarities and differences. Retrieved from http://www.netc.org/focus/strategies/iden.php
- This example would look pretty similar in any type of classroom. However, I would ensure that we draw pictures to create meaning because of the expected language load. Also, I would want to include a journal for each student to keep that contains the class metaphors. These will be used as great teachable moments that are recorded so that the students can look at them later.
Source:
Northwest Regional Educational Laboratory (2005). Identifying similarities and differences. Retrieved from http://www.netc.org/focus/strategies/iden.php

5. Classification (Bubble Chart):
Basics:
Time Needed: 10-20 minutes
Room Arrangement: Any
Materials Needed: Paper/template
Process Directions:
A classification activity is a strategy that teachers can use to help students organize information based on similar qualities. It is a different way of seeing the ways that different things and ideas are related to one another. Typically, teachers will use graphic organizers to visually show the relationships between the items. It could be in the form of a chart, bubble flow chart, or semantic map. My process is based on the bubble flow chart:
1. Introduce layout/template to students
2. Define with students the major title that everything will fit into and write it into the big circle at the top.
3. Define with students the subtitles or subcategories and write them in the circles that are branching off the title circle.
4.Add more subcategories if needed or begin listing things/ideas that fall under the categories already created.
5. Keep going until students have compiled a good list of things they can use to support their understanding.
Here is an example of a bubble flow chart for an English classroom:

Learning Call (2012). Retrieved from http://www.learningcall.net/2012/10/graphic-organizers.html
Examples in a Language Classroom:
Source:
Apthorpe, H. (2010). Classroom instruction that works. MCREL. Retrieved from http://files.eric.ed.gov/fulltext/ED543521.pdf#page=21
- Spanish: There are many different ways that this can be used in a Spanish classroom. I envision using the bubble flow chart to categorize different Spanish speaking countries. For example, students could compare the more European, African, or American influenced Spanish speaking countries based on their characteristics.
- ESL: I can see many ways that this classification system would be beneficial for ELLs. An example of how I would use this strategy would be similar to the bubble chart shown above. Writing in English is often a very difficult task and I would want to help students classify the characteristics of writings that have different purposes. For example, the major title could be "Writing" or even as specific as "Writing a letter." Then some subcategories could be "informative," "persuasive," and "journal." Under these sub-categories, students can write specific words and phrases found in the different types of writing.
Source:
Apthorpe, H. (2010). Classroom instruction that works. MCREL. Retrieved from http://files.eric.ed.gov/fulltext/ED543521.pdf#page=21

6. Running Stack & Sort:
Basics:
Time Needed: 10-20 minutes
Room Arrangement: Desks should be moved so that they're not near walls where the categories are posted.
Materials Needed: Sticky notes, strips of poster board, markers, each student needs a writing utensil
Process Directions:
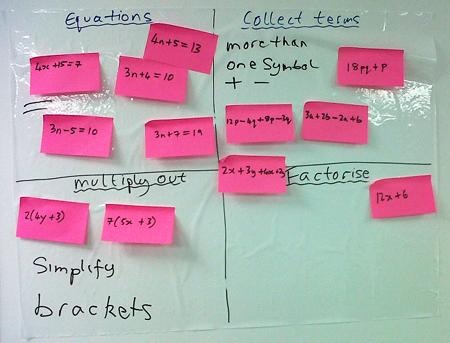
This activity is another type of classification activity like number 5. The difference is that it is more student directed initially, and I have transformed it in order to use it as a competition and warm-up activity before students are asked to create a hypothesis. Although this specific activity is unique and not research based, the fundamentals of how it is used and its purpose is based heavily on classification research principals.
1. Students are introduced to vocab items/ideas that need to be categorized. These could be animals, a grammar structure, or anything in between.
2. As a class/group, students discuss and debate the way things are connected and decide on the necessary categories.
3. The teacher/student writes the categories on a strip of poster and places them either in a central location (all on the white board for example) or all around the classroom.
4. Individual students/groups are given time (1 -2 minutes) to record words on sticky notes.
5. Individual students/groups are given time (5-7 minutes) to "run" (quickly and respectfully walk) with sticky notes and place them in the appropriate categories
6. Any time that students have left can be used to research (dictionary, Google, SpanishDict) new, similar words that can be added to the categories or new categories that can be created and added around the room.
7. Once the time is up, teacher and students discuss what is found in each category and the new words that were found. Questions that focus on the purpose of the activity are: Do the words fit? Can they also fit somewhere else? Should the category be renamed or clarified?
Here is a Math example of a sorting task using sticky notes:
Time Needed: 10-20 minutes
Room Arrangement: Desks should be moved so that they're not near walls where the categories are posted.
Materials Needed: Sticky notes, strips of poster board, markers, each student needs a writing utensil
Process Directions:
This activity is another type of classification activity like number 5. The difference is that it is more student directed initially, and I have transformed it in order to use it as a competition and warm-up activity before students are asked to create a hypothesis. Although this specific activity is unique and not research based, the fundamentals of how it is used and its purpose is based heavily on classification research principals.
1. Students are introduced to vocab items/ideas that need to be categorized. These could be animals, a grammar structure, or anything in between.
2. As a class/group, students discuss and debate the way things are connected and decide on the necessary categories.
3. The teacher/student writes the categories on a strip of poster and places them either in a central location (all on the white board for example) or all around the classroom.
4. Individual students/groups are given time (1 -2 minutes) to record words on sticky notes.
5. Individual students/groups are given time (5-7 minutes) to "run" (quickly and respectfully walk) with sticky notes and place them in the appropriate categories
6. Any time that students have left can be used to research (dictionary, Google, SpanishDict) new, similar words that can be added to the categories or new categories that can be created and added around the room.
7. Once the time is up, teacher and students discuss what is found in each category and the new words that were found. Questions that focus on the purpose of the activity are: Do the words fit? Can they also fit somewhere else? Should the category be renamed or clarified?
Here is a Math example of a sorting task using sticky notes:
Burnett, K. (2013). The unreasonable effectiveness of sorting and posting tasks. Retrieved from http://www.sohcahtoa.org.uk/pages/maths_sorting-and-posting.html
Examples in a Language Classroom:
Source:
This source explains the benefit of using classification activities, but not the benefit of using this specific adaptation.
Garner, B. K. (2008). When students seem stalled. Educational Leadership 65(6), 32-38. Retrieved from http://www.ascd.org/publications/educational-leadership/mar08/vol65/num06/When-Students-Seem-Stalled.aspx
- Spanish: A way that I envision using this strategy is exemplified in my applied lesson for this profile. I had the students categorize and sort Spanish words with native origins. This helped them see the types of words that were transferred. It was also the foundation for hypothesizing about why these types of words were adopted. I first had students look at English words with native origins and they defined categories based on that system and then applied it to Spanish words.
- ESL: There are many different ways that I can use this strategy with ELLs, although it might be more beneficial to make it more teacher-directed. An introductory literacy example could be having the students sort nouns, verbs, and adjectives from sentences.
Source:
This source explains the benefit of using classification activities, but not the benefit of using this specific adaptation.
Garner, B. K. (2008). When students seem stalled. Educational Leadership 65(6), 32-38. Retrieved from http://www.ascd.org/publications/educational-leadership/mar08/vol65/num06/When-Students-Seem-Stalled.aspx

7. Folded Comparison Chart:
Basics:
Time Needed: 20 minutes
Room Arrangement: Any
Materials needed: Objects of comparison, template/paper, pencil
Process Directions:
This is similar to other graphic organizers that help students organize their thoughts and concretely see the points of similarity and dissimilarity. I particularly prefer that the students fold the paper themselves instead of being given a template. It allows them to kinesthetically feel the separation of different thoughts. They can focus on one compartment at a time instead of trying to visualize the whole story at once.
1. Students take a paper and fold it in half lengthwise (hot dog style) without creasing it.
2. Pinch the paper in the middle and crease from the middle to the top.
3. Fold the paper in half the other way (top to bottom) and crease.
4. Fold the bottom of the paper so it meets the middle and crease.
5. The two columns at the top represent the objects of comparison, whether they be physical, literary, or grammatical. In each column the student will record as many pertinent facts as they can about the object.
6. The two rows at the bottom are labeled "similarities" and "differences" respectively. Here students can record the similarities and differences based on the information they already wrote in the two columns above.
7. That could be the end of the process or it could be used as a pre-writing activity or a way to synthesize information used during a unit.
Here is what the the paper should look like:

Examples in a Language Classroom:
Source:
Huff, D. (2005). Comparison/contrast graphic organizer. Retrieved from http://www.huffenglish.com/comparisoncontrast-graphic-organizer/
- Spanish: This activity could be used in many different ways in a Spanish classroom. I envision using it as a way to compare and contrast different family structures. For example, the first item could be a "normal" American family structure and the 2nd item could be a "normal" Mexican family structure. After learning about both, the students can write the points of similarity and differences.
- ESL: This activity is particularly well-suited for ELLs because of the easy-to-see compartmentalization of thought. I plan on using it with my students in order to give them a way to compare different types of writing or different genres of literature. It could be a strategy used to transition from talking about one type to the other so that students don't over-apply their knowledge to a new set of information.
Source:
Huff, D. (2005). Comparison/contrast graphic organizer. Retrieved from http://www.huffenglish.com/comparisoncontrast-graphic-organizer/
